


So you’re on a quest to discover user testing best practices? You’ve arrived at the right place to take your product from ‘good’ to exceptional! Here at Userbrain, we’ve been actively shaping the future of user testing for over a decade. In that time, we’ve seen our fair share of utterly amazing and absolutely shocking user tests – we’ve even made a few faux pas of our own! In this article, we’ll educate you on some user testing best practices and walk you through how to conduct a user test and analyze user testing results. Still with us? Great!
Start testing in minutes and get results within hours. Tap into our pool of 170k+ testers and watch videos of users interacting with your product on their devices. Discover what’s working for your product, and what’s not!
Start your free trialWhy is user testing an important part of the design process?
Before we jump right in, it’s really good to take a step back and understand why we’re making time in our busy schedules to conduct user testing. In short, user testing sits at the heart of the design process; it bridges the gap between assumption and reality. User testing is your direct line to understanding how real people interact with your product. After a few hours of user testing, you’ll begin to figure out exactly what’s working for your product and what’s not.
By integrating user testing early and continuously throughout the design process, designers can identify and address usability issues before they cost a fortune to fix. Not only will user testing help you reach peak user satisfaction, but it will drive your product forward, making sure your designs are user-centered to the core!
How to conduct a user test: 10 easy steps with best practices
Let’s get down to the nitty-gritty. Here’s your 10-step plan to conduct perfect user tests, with ten user testing best practices thrown in there for good measure. Let’s start off with step 1 and continue in chronological order.
Step 1: Create a new test
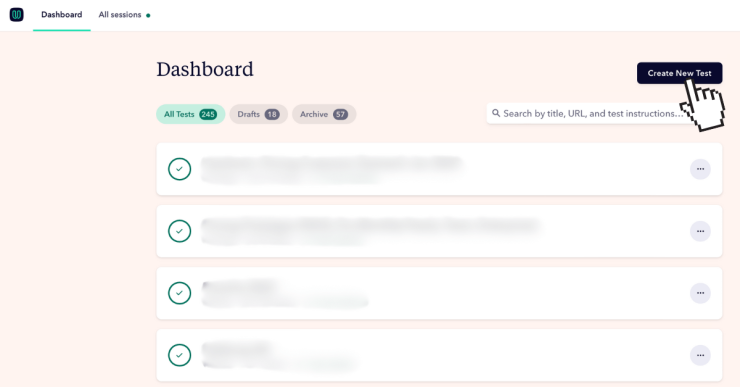
Right, step one was kind of obvious, I’ll admit. If you want to start user testing, you’ll need to create a test. Simply log in to the Userbrain dashboard and click ‘Create New Test’ in the top right corner. In step 2, we’ll take it from there, soldier.
User testing best practice: Take advantage of Userbrain’s free trial 💡
Did you know that you’ll get 2 free testers just by starting a free trial at Userbrain? Oh, it’s true. So why don’t you open another browser tab, go sign up and then we’ll reconvene here in 90 seconds so you can follow the steps as you create your first test? Start free trial! 🚀
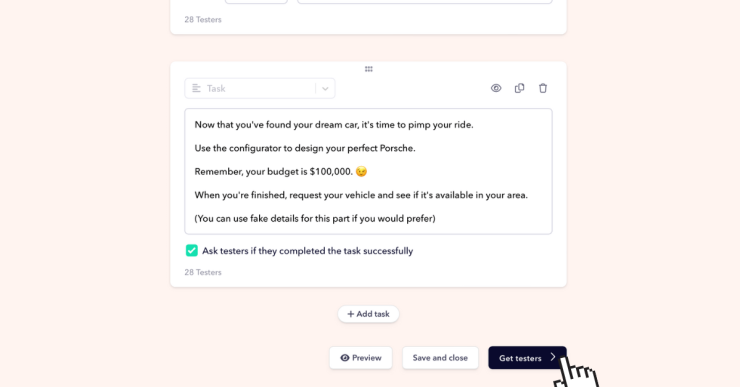
Step 2: Create a scenario and a set of tasks
User testing best practices: Copy Userbrain’s free user testing templates 💡
Check out our user testing templates library (it’s free!) if you’re struggling to write good tasks. With over 50 examples of exemplary user tests featuring various well-known products and services, you’ll discover an abundance of inspiration there! Or, better yet, simply click ‘Use template in my test.’ You’ll be redirected to your Userbrain dashboard, where that exact test will be ready and waiting for you to edit. Pretty slick, huh? Yeah, we think so too…
Step 3: Filter testers by demographics (optional)
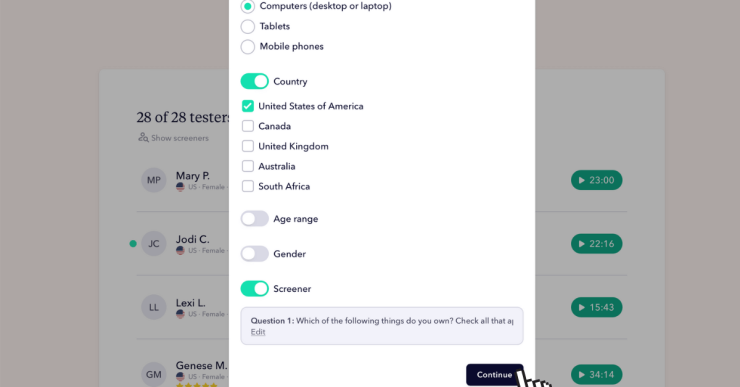
I’m going to go out on a limb here and make a prediction: you don’t just want any old Tom, Dick, or Harry (or Marguerite, for that matter) testing your product. You’ll want to whittle down the 125,000-strong Userbrain testing pool with some nifty demographic filters. On this page, you can filter by device, country, age range, and gender – the whole shebang – to get pretty darn close to your ideal target users.
User testing best practices: You don’t need to test with your target users 💡
Whatcha talkin’ ’bout, Willis? In all seriousness, you don’t need to test with your target users. In fact, in the majority of cases, it might even be a bad idea. We discovered that in our own demographic research, which you’re more than welcome to read.
Furthermore, when it comes to user testing recruitment, every Userbrain tester is quality-assuredand must pass a rigorous examination process before being allowed to test your product.
Step 4: Pre-screen testers with screening questions (optional)
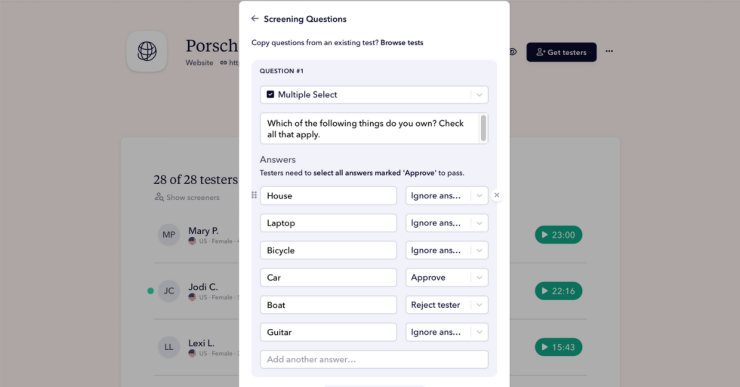
What’s that? You’re still absolutely dead set on testing with your target users… even after we said it wasn’t necessary? All good; we’ve got you covered with our screening questions. You can add up to two screening questions within a test and choose between single-choice and multiple-choice options.
User testing best practices: Include a red herring answer in every screening question 💡
It might seem obvious, but if you create a multiple-choice screening question and approve one answer, while setting the rest to ignore, then anyone can pass your screening question simply by selecting all the answers. So here’s a top tip on how to create better screening questions.
In the example above, we’ve asked our prospective testers: Which of the following things do you own? Check all that apply.
We’re interested in testers who own a car because it’s a dummy test for Porsche (they make fast cars that go vroom, if you weren’t familiar with the brand). So, as you can see, ‘car’ is the only answer set to approve. The rest (house, laptop, bicycle, and guitar) are set to ignore, while ‘boat’ is our red herring – that answer is set to reject.
Why? First, we want to stop pranksters from selecting all options to get accepted for the test. Second, I’m pretty sure if someone owns a BOAT they probably own a Porsche anyway. Therefore, they’ve probably been crawling all over the Porsche website before, and I don’t want to hear their opinion because it’s not… fresh.
Step 5: Order testers
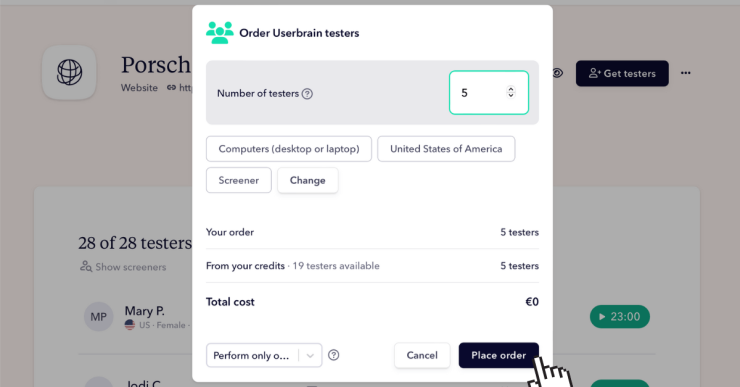
Oh, my goodness. The tension, the excitement! We’re about to click ‘place order,’ so you better be darn sure you’ve not made any mistakes in the test setup. Spoiler alert: of course, you haven’t because you’ve followed this guide to the letter. Take a deep breath.
Now, all you need to do is choose the number of testers you want to order and decide whether you want to run this test only once or continuously (e.g. weekly, monthly).
User testing best practices: Invite your own users too 💡
Did you know that 100 invitational sessions are included with every Userbrain subscription (Starter, Pro, Agency, Enterprise)? Well, you do now! Testing your product with your users will often provide different (but equally valid) usability insights compared to first-time tester feedback.
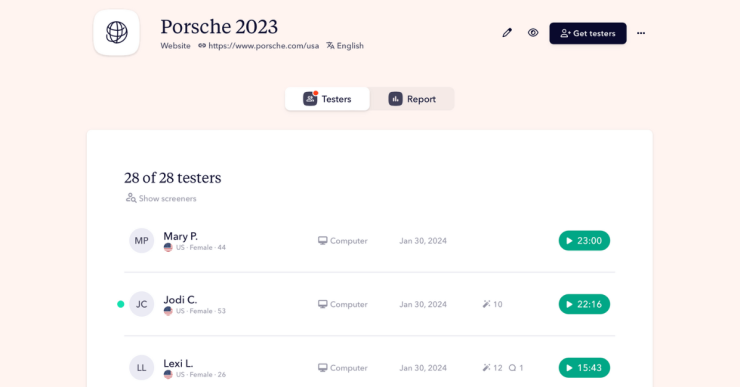
Step 6: Watch the user test video
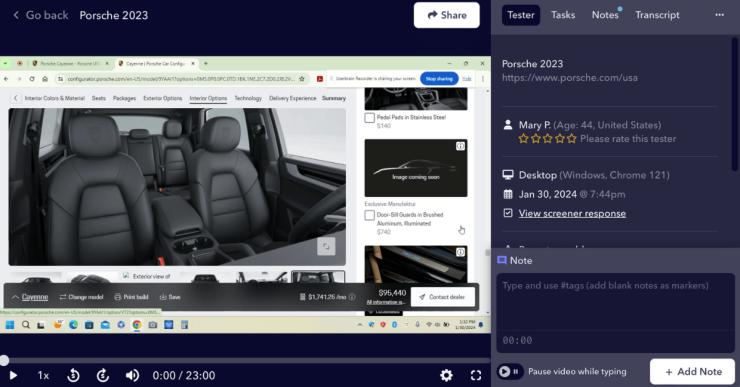
It’s probably been about 45 minutes since you ordered now. All of your test videos are either ready to watch, in processing, or the tester is just adding the final je ne sais quoi [insert chef kiss here].
When you click on a video, you’ll be presented with the screen as shown in the screenshot above. From this view, you can toggle between the four tabs: Tester, Tasks, Notes, and Transcript. You can see the tester’s name, age, and country, and you can use the buttons to view in full screen, fast-forward, rewind, adjust the playback speed, and add notes.
Finally, you are welcome to rate the tester out of 5 with a star rating after you’ve finished watching and analyzing the video. Please do this. It helps keep our algorithm healthy by always providing the best quality testers. This way, we make sure that our users get the best-rated testers available.
User testing best practices: Watch the video first, and then make notes 💡
This gets a bit time-consuming if you’re conducting user testing rounds with about 400 people, granted. However, if you’re a normal person (i.e., you’re running a user testing round with between 3 and 15 testers), it’s always best to immerse yourself completely in the user test video the first time around. So grab a fresh cup of coffee, put that baby into fullscreen, and enjoy the show! Remember, the goal of user testing is to observe real person’s behavior within the context of using your product. So don’t try and make notes while you’re watching, because you’ll probably miss something.
Step 7: Use AI Insights to save time and effort (optional)
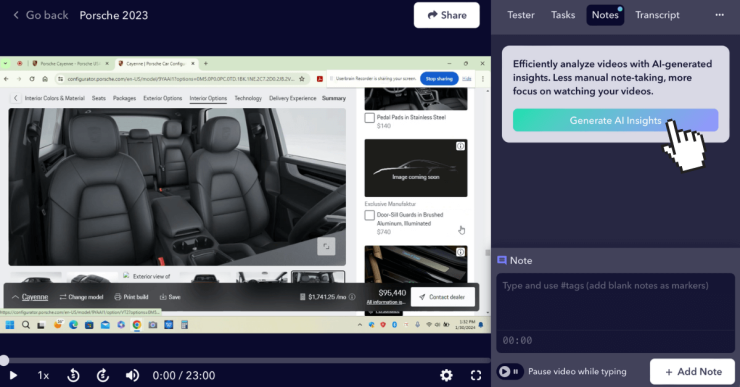
Do you know how we just advised you to watch the entire user test before writing any notes? Well, there’s a good reason for that. The boffins at Userbrain have conjured up an ingenious solution: AI user testing. Basically, Userbrain’s AI Insights feature analyzes the entirety of the user test transcript and uncovers many UX insights instantly. In fact, AI Insights is so good that it often catches insights that we, supposed user testing experts at Userbrain, miss… how embarrassing!
User testing best practices: Save time and effort with AI Insights 💡
Yes, we know it’s listed as an optional step, but AI Insights is included with every subscription (Starter, Pro, Agency, and Enterprise), so you’d be crazy not to use it. We can almost guarantee our AI assistant will take the stress out of your analysis process while saving you hours of time and effort. But try it for yourself because we appreciate that AI isn’t everyone’s cup of tea, and that’s fine. Simply click ‘Generate AI Insights’ from within the ‘Notes’ tab and watch the magic trick happen before your eyes.
Step 8: Add your own timestamped notes
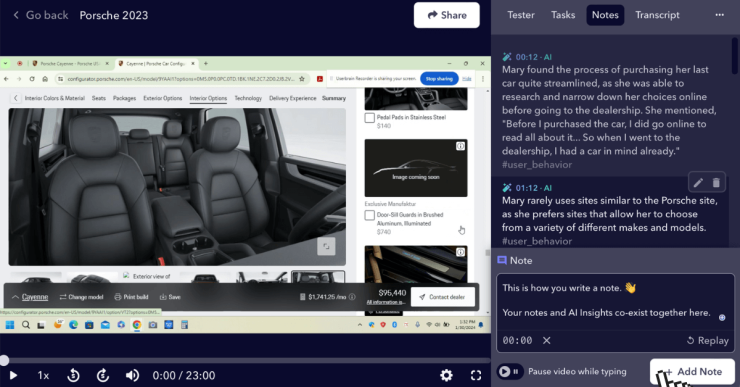
Just as your little AI assistant will capture a few insights you’ll miss, the same will be true vice versa. That’s why you can add your own timestamped notes. Simply start typing at any point in the video, and the timestamp will be automatically applied to your note, which will be visible alongside the AI Insights in the ‘Notes’ tab.
User testing best practices: Collaborate with your teammates 💡
Not only are your own notes distinguished from the AI Insights, but your teammates’ notes are easily distinguishable from your own, too. So, there’s no excuse for not watching your user test videos together and allowing the whole team to jot down their thoughts and findings. Plus, all of your notes and the AI Insights will be displayed in the Report tab, which we’ll get onto in a step or two…
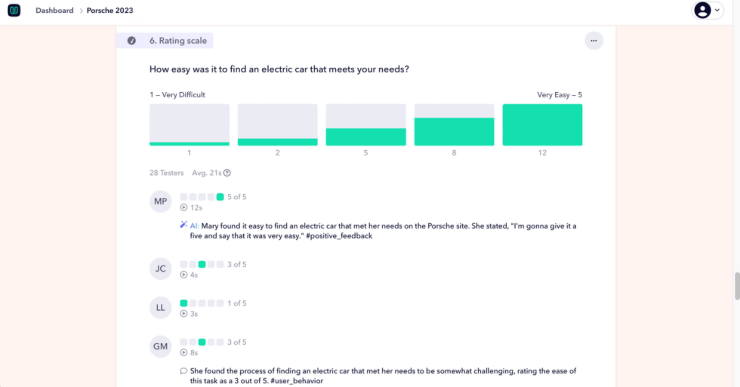
Step 9: Toggle between Testers and Report tabs
Once you’ve watched all of your user testing videos and uncovered some great insights, it’s time to zoom out and explore another area of the dashboard: the Report tab. Simply toggle between ‘Testers’ and ‘Report’ in your test dashboard to go back and forth as you please.
User testing best practices: Don’t overlook quantitative metrics in the Report tab 💡
Aha… nice surprise, right? You thought user testing was just for gathering qualitative insights, right? Wrong! At Userbrain, we’ve incorporated some clever and insightful quantitative metrics into our test reports, including time on task, task completion rate, and average time on task. Make sure you don’t overlook these numbers; we put them there to help you.
Step 10: Share presentation-ready Reports with stakeholders
So you’ve run your user test, watched all the videos, and now know something is wrong with your product. But how do you make sure of stakeholder buy-in to get it fixed? Don’t worry, Userbrain’s got your back! Simply share the link to the Reports tab with stakeholders so they can read through your qualitative insights and quantitative metrics.
User testing best practices: Report your findings to stakeholders with Reports 💡
Did we mention that our Reports are presentation-ready? Once or twice? Got it. If you’ve ever been in a board meeting, you’ll appreciate that the only way to get information across to some folks is with pretty colors, pie charts, and the like. Ladies and gentlemen, allow me to answer your prayers with Userbrain’s presentation-ready Reports. Not only will stakeholders take your findings seriously, they’ll be able to pay attention for more than 45 seconds. Yay!
Your first user test? That’s a wrap!
Well done, you’ve just completed your first user test. Or, at least, you’ve read through our first-class demonstration of how to conduct a user test. Conducting a user test and analyzing the results… it’s easier than you thought it would be, isn’t it? That’s a totally normal reaction. Sometimes we get our knickers in a twist, thinking that user testing is complicated. In reality, it’s like riding a bicycle. Sure, you might fall flat on your face a couple of times a the start, but you’ll be ripping up the Tour de France in no time at all. And what’s the Tour de France for UX researchers? A Userbrain subscription, of course.
Your next steps with Userbrain
Get started with your first test, and two testers on the house. Start free trial! 🚀
Need a hand deciding on which user testing package is best for your needs? Our friendly team is ready to take your call. Book a call! 👋